A simple example of instantiation
The following example creates a trivial workflow
named HelloWorld1. The
objective of this example is not to show the branching structure that
you can create in workflow. Rather, the purpose of this exercise is to
construct the workflow, trigger the workflow, and examine the workflow
in the PolicyCenterWorkflow console. The example keeps
the workflow as simple as possible. The workflow consists of the following
components:
<Context> Workflow Element<Start> Workflow ElementStep1Step2DefaultOutcome<Finish> Workflow Element
A Simple ClaimCenter Example
For the workflow to run and do some work and appear on the workflow console, the example instantiates it from a Claim Update rule. If you attempt to instantiate the workflow from a link or button on a Claim view screen (Claim Summary, for example) the workflow executes but does not update anything. Also, it does not appear in the Workflow console.
To cause updates to happen, the example instantiates the workflow from an Edit screen in ClaimCenter. It then calls a Claim Preupdate Rule in Studio.
To create a simple workflow and instantiate it
- Create a HelloWorld1.eti file (in )
and populate it with the following:
<?xml version="1.0"?> <subtype desc="HelloWorld 1 Example Workflow" entity="HelloWorld1" supertype="ClaimWorkflow"> <typekey desc="Language" name="Language" typelist="LanguageType"/> </subtype> - Stop and restart Studio.
- Select your new workflow type from the Workflows node. Right-click and select .
- Create a simple workflow process similar to the following. It does not need to be complex, as it simply illustrates how to start a workflow from the ClaimCenter interface.
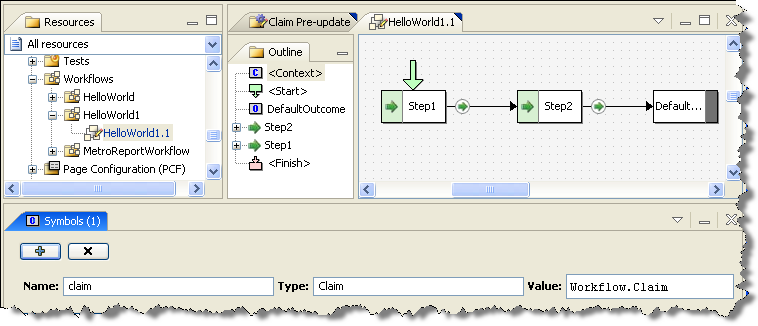
Notice that
it has a claim symbol
set in <Context>
Workflow Element.
- For
Step1, add the following to theEnterblock for that step:gw.api.util.Logger.logInfo( "HelloWorld1 step 1, step called ClaimNumber " + claim.ClaimNumber) Workflow.log( "HelloWorld Step 1", "HelloWorld1 step 1 entered: Claim Number " + claim.ClaimNumber ) - For
Step2, add the following to theEnterblock for that step:gw.api.util.Logger.logInfo( "HelloWorld1 step 2, step called ClaimNumber " + claim.ClaimNumber) Workflow.log( "HelloWorld Step 2", "HelloWorld1 step 2 entered: Claim Number " + claim.ClaimNumber ) - Create a simple Claim Pre-Update rule similar
to the following:
- The rule condition specifies that PolicyCenter instantiates the workflow
only if the claim
PermissionRequiredproperty is set tofraudriskclaim. - The rule action instantiates the
HelloWorld1workflow. It first tests for an existingHelloWorld1workflow that is not in the completed state and that has the same claim number as the one being updated. If it does not find a matching workflow, then PolicyCenter instantiatesHelloWorld1and logs the information.
- The rule condition specifies that PolicyCenter instantiates the workflow
only if the claim
Rule Conditions:
claim.PermissionRequired=="fraudriskclaim"Rule Actions:
gw.api.util.Logger.logInfo( "Entering Pre-Update" )

 var hw_wf = claim.Workflows.firstWhere( \ c -> c.Subtype == "HelloWorld1"
        && (c as entity.HelloWorld1).State !="completed"
        && (c as entity.HelloWorld1).Claim.ClaimNumber==claim.ClaimNumber)

if (hw_wf == null) {
  gw.api.util.Logger.logInfo( "## Studio instantiating HelloWorld1 and starting it!" )
  var workflow = new entity.HelloWorld1()
  workflow.Claim = claim
  workflow.start()
}- Log into ClaimCenter and open any sample claim.
- Navigate to the Claim Summary page, then select the Claim Status tab.
- Click Edit and set the Special Claim Permission value
to
Fraud risk. - Click Update. This action triggers the
HelloWorld1workflow.
To view the server console
- Navigate to the application server console.
- View the logger statements.
To view the Workflow console
- Log into ClaimCenter using an administrative account.
- Navigate to the Administration tab and select Workflows from the left-side menu.
- Click Search in the Find Workflows screen. You do not
need to enter any search information. Studio displays a list of workflows,
including
HelloWorld1. - Select
HelloWorld1from the list and view its details.