Extending a workflow: a simple example
This simple examples illustrates the following steps:
Step 1: Extend an existing workflow object
To extend an existing workflow object, review the steps outlined in Extend an existing workflow. For this example, you create a new ExampleWorkflow object by extending (subtyping) the base Workflow entity.
To extend a workflow object
- Create a new ExampleWorkflow.eti file and enter the following:
<?xml version="1.0"?> <subtype desc="" entity="ExampleWorkflow" supertype="Workflow"> <typekey desc="Language" name="Language" typelist="LanguageType"/> </subtype> - Close and restart Studio.
You now see an ExampleWorkflow
entry added to the Workflow
typelist and a new ExampleWorkflow
workflow type added to Workflows in the Resources
tree.
After completing this task, complete Step 2: Create a new workflow process.
Step 2: Create a new workflow process
Before beginning this task, complete Step 1: Extend an existing workflow object.
Next, you need to create a new workflow
process from your new ExampleWorkflow
type.
To create a new workflow process
- Select
ExampleWorkflowfrom Workflows in the Project window. - Right-click and select New Workflow from the menu.
Studio opens an outline view and layout view for the new workflow process:
- The outline view contains the few required workflow elements.
- The layout view contains
a default outcome (
DefaultOutcome).
After completing this task, complete Step 3: Populate Your workflow with steps and branches.
Step 3: Populate Your workflow with steps and branches
Before beginning this task, complete Step 2: Create a new workflow process.
Finally, to be useful, you need to add outcomes, steps, and branches to your workflow. This examples creates the following:
- A
Step1(AutoStep Workflow Step) with a defaultGObranch to theDefaultOutcomestep, which you designate as the first step in the<Start> Workflow Elementelement - A
Step2(ManualStep Workflow Step) with aTRIGGERbranch to theDefaultOutcomestep - A
Step3(ActivityStep Workflow Step) with aGObranch to theDefaultOutcomestep - A
TIMEOUTbranch fromStep2toStep3, with a5dtime delta set - A
Step4(MessageStep Workflow Step) with a GO branch fromStep1toStep4
The example workflow looks similar to the following:
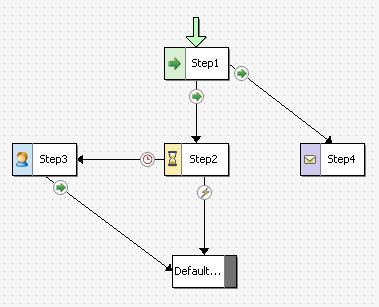
This example does not actually perform any function. It simply illustrates how to work with the dialogs of the Workflows editor.
To add steps and branches to a workflow
- Right-click within an empty area
in the layout view and select New AutoStep from the menu:
- For Step
ID, enter
Step1. - Do not enter anything for the other fields.
- For Step
ID, enter
Studio adds your autostep to the layout view
and connects Step1 to
DefaultOutcome with a
default GO
branch.
- Select <Start> Workflow
Element in the outline view (middle pane):
- Open the First Step drop-down in the property area at the bottom of the screen.
- Select
Step1from the list. This sets the initial workflow step toStep1. - Save your work.
- Right-click within an empty area
in the layout view and select New ManualStep from the
menu:
- For Step ID, enter Step2.
- For branch Type,
select
TRIGGER. - For trigger
ID,
select
Cancel.
The ID value sets a valid trigger
key as defined in typelist WorkflowTriggerKey.
If Cancel does not exist,
then choose another trigger key. If no trigger keys exist in WorkflowTriggerKey, then you must
create one before you can select TRIGGER
as the type.
- Select the
GObranch (the line) leavingStep1:- In the property
area at the bottom of the screen, change the To
field from
DefaultOutcometoStep2. Studio moves the branch to link the specified steps. - Realign the steps for more symmetry, if you choose.
- In the property
area at the bottom of the screen, change the To
field from
- Right-click within an empty area
in the layout view and select New ActivityStep from the
menu:
- For Step ID, enter Step3.
- For Name,
enter
ActivityPatternName. - For Pattern,
enter
NewActivityPattern.
- Select
Step3, right-click, and select New TIMEOUT from the menu:- For Branch ID, enter TimeoutBranch.
- For Time Delta, enter 5d. This sets the absolute time to wait to five days.
- For To,
select
Step3.
Studio adds a branch from Step2 to Step3 and adds the timeout symbol
to it.
- Right-click within an empty area
in the layout view and select New MessageStep from the
menu:
- For Step ID, enter Step4.
- For Dest ID, enter 89 (or any valid message destination ID).
- For Event Name, enter EventName.
Studio adds the step to the layout view and creates
a link between Step4 and
DefaultOutcome.
- Select the new link from
Step4toDefaultOutcome.- In the property
area at the bottom of the screen, change Arrow
Visible to
falseto delete this link.
- In the property
area at the bottom of the screen, change Arrow
Visible to
Studio removes the link (branch).
- Select
Step1, right-click, and select New GO from the menu:- For Branch ID, enter Step4.
- For To,
select
Step4.
Studio adds the new GO branch between Step1 and Step4.