Changing the screen layout
You can adjust several aspects of the screen layout according to your own preferences.
Adjusting list views
You can change the default appearance and behavior of individual list views, including the column order, sort order, and which columns are visible. Changes to list views are stored as user settings, and remain in effect until you change or reset them.
Change list view column order
About this task
You can change the order in which columns appear in a particular list view.
Procedure
- Click and hold the left mouse button on the heading of the column that you want to move.
-
Drag the mouse pointer across the other column headings until it is between the
two columns where you want to place the moved column.
If it is valid to move the column there, the column turns from gray to highlighted.

- Release the mouse button.
Change list view column widths
About this task
You can resize a list view column to make it wider or narrower than it currently is. This change remains in effect until you reset customized columns.
Procedure
-
Position the mouse pointer over
the left or right border of the column heading. The pointer turns into
a double arrowhead
 .
.
- Drag the column border to the new width.
Sort list views
About this task
You can change the column on which a list view is sorted, and also the sorting direction. You can sort on only one column at a time.
Procedure
- To sort a list view on a particular column, click the column heading.
- To change the sort direction of a list view column, click the up or down
arrow on the heading of the column on which the list is currently
sorted:

Results
The up or down arrow is highlighted, indicating the direction in which the list is sorted.
Hide and show columns in a list view
About this task
You can change which columns appear in a list view.
Procedure
-
At the right edge of the list view toolbar or title row, click
Columns
 .
.
-
In the drop-down list, click the columns that you want to change:
- To hide a column, clear the check box for the column.
- To show a column, set the check box for the column.
Arrange list view rows into groups
When multiple rows in a list view have the same value for a particular column, you can arrange them to be listed together in a group.
About this task
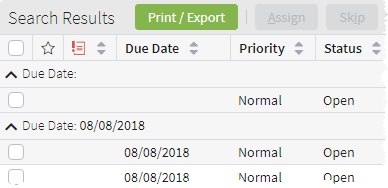
Each group appears in the list view under a new heading row for the common value. For example, if you have a list of activities, you can group them by their values in the Due Date column. The related activities are then listed together under a heading for each due date.
The following example shows rows grouped by Due Date.
To collapse or expand a group, click the up arrow ![]() or down arrow
or down arrow ![]() next to the group name.
next to the group name.
You can group a list view only by one column at a time.
Procedure
-
At the right edge of the list view toolbar or title row, click
Columns
.
-
In the drop-down list of columns, click
Group/Ungroup
 next to the column on which to base the
group.
If the list view is already grouped by that column, then clicking Group/Ungroup disables the grouping.
next to the column on which to base the
group.
If the list view is already grouped by that column, then clicking Group/Ungroup disables the grouping.
Reset list view columns
Restore the appearance and behavior of list views to the default settings.
About this task
Procedure
-
At the right edge of the list view toolbar or title row, click
Columns
.
- In the drop-down list, click Reset Customized Columns.
Disable list view customization
Set the disableUserCustomization
property to prevent users from making changes to the appearance and behavior of a particular
list view.
About this task
You can disable customization on a
ListViewInput or a ListViewPanel widget. In most
situations, list view customization is enabled by default. However, in some configurations
such as a ListViewInput defined inside of an InputColumn,
customization may be disabled by default. If desired, you can then edit the list view and
change the property setting.
Procedure
- In Guidewire Studio, open the PCF file containing the list view.
- Click the list view widget.
-
In the Properties tool window,
set the
disableUserCustomizationproperty to true.
Change the sidebar width
About this task
You can resize the sidebar to made it wider or narrower than it currently is. This change remains in effect until you log out.
Procedure
-
Position the mouse pointer over
the right border of the sidebar. The pointer turns into a double arrowhead
.
- Drag the sidebar border to the new width.